


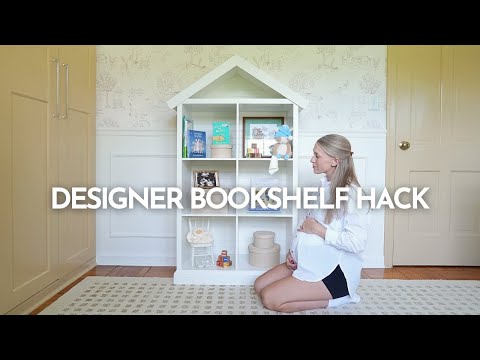
I am wrapping up projects in the nursery, but realized we don’t really have any storage for books or toys. Sooo I jumped on Pinterest to find the most adorable bookshelves only to find out some of them cost over $1,000!!?? Since we love to DIY I decided to build my own version for a fraction of the cost using this $65 cube shelf hack!
INSPO:


We don’t know the gender of the baby yet, so I tried to keep this as neutral as possible. While I would have loved to add some scalloped trim and girly touches I held back. Instead of the doll house look I went for a book house instead..


Materials/Tools:
| Materials/Tools | Link |
| 6 Cube Organizer | https://bit.ly/3Wk7XmZ |
| Beadboard Panel | https://bit.ly/3UF1MqI |
| Fluted Trim | https://bit.ly/3PKHN9j |
| Base Trim | https://bit.ly/3Wk86a1 |
| 1″x16″ Laminated Pine | https://bit.ly/3Y3q7Lg |
| Circular Saw | https://bit.ly/3XZQxxi |
| Brad Nailer | https://bit.ly/3Y2Oto9 |
| Drill & Driver | https://bit.ly/4cFWt2Z |
Assemble cube system
For the main structure of this project I’m using this 6 cube system from Target. For only $65, I’m very happy with how sturdy it feels. This is a great piece to build off of.


Lumber
For lumber, I’m used this 1×16” Laminated Pine as the roof


Next, I used a 2×4 that we ripped down for the base.


I used this fluted trim to trim out the roof.


This is 3 1/4” base trim. We had some scrap pieces laying around in the workshop.


We also had some scrap bead board from a previous project so that’s what I’ll be using for the back panel of the bookshelf.


Assemble Base Frame
The first step is to assemble the base frame.


I wanted to add a base frame and some nice trim to the shelves to make it look more like a piece of furniture. For the base frame I used a 2×4 and ripped it down to 2 1/4”. I cut the 2×4’s down to create a box that is the same dimension as the bottom of the cube shelving. Once the pieces were cut to size I secured the frame together with wood screws.


The base is assembled, now I can attach the cube shelves to it. We set the shelves on top, I drilled holes in each of the corners and then secured some small cabinet screws down into the frame so it’s nice and secure.


Install Base Trim
The base frame is 2 1/4” the bottom panel of the cube system is 1 1/4” and my base trim is 3 1/4” so that means that there will be a 1/4” reveal of the bottom panel which is exactly what I was going for. I mitered the corners of the base trim and then secured it to the base frame with 1 1/2” brad nails. I left the back open because it will be going against a wall, and I’m going to be securing a 1/4” panel of bead- board on the back. I left the base trim 1/4” long to account for that bead board to fit in.


Install Roof
For the roof of the bookshelf I’m using this 1×16” laminated pine board. It came in 76” length. We ripped it down to match the depth of the cube system which was 14 1/2”. Once it was ripped down we mitered one end of the peak and put it through the table saw at a 22 1/2 degree angle. You can play around with the angle and decide on whatever looks best depending on if you want a more steep or less steep peak. We ended up doing a 2 1/2” overhang on each side of the roof as well.


To secure the two panel pieces together we used wood glue and brad nails.


The roof is assembled and now we can secure it to the top of the bookshelf. We made sure the roof was flush and the peak was centered then secured it down into the top of the bookshelf right where the roof and shelf meet. You can slightly see the nails from underneath but once the face trim is on you won’t be able to see these nails.


Cut Bead Board
I had some scrap bead board laying around so I decided to use that for the backer board. We cut the panels down to size, dry fit them and then we will wait to secure them until after painting.


Install Roof Trim
For the roof trim I went with this fluted trim. You can also do some fun scalloped trim to make it more girly – but I wanted to try and keep it a bit more neutral since we don’t know if baby is going to be a boy or girl. I cut the peak of the trim at the same angle as the roof and secured it to the roof panel with brad nails.


Fill Nail Holes & Sand
Next, I filled all the nail holes. Then sanded down all the corners and edges of the roof. We don’t want any sharp corners especially since this is going in the baby’s room.


Prime & Paint
Finally, we can prime and paint!! I decided to get the paint sprayer out and paint this outside. Leaving the back panel off the shelf made painting a lot easier. I did a coat of primer and a coat of Swiss Coffee by Benjamin Moore to match the same white paint color in our nursery.

Install Bead Board
After the paint dried I was able to secure the bead board to the back of the cube system using my brad nailer.


And voila we have a beautiful designer inspired bookshelf for a fraction of the cost. This will hold tons of books and toys when baby gets older. It’s a great DIY hack that will bring lots of joy in the years to come.


Check out more DIY tutorials HERE!