

My husband and I moved into a fixer upper house late last year and the first major project that we wanted to tackle was the master bathroom. The bathroom had a tiny vanity and a toilet with barely enough room to maneuver in and out. Luckily, the walk-in closet was just on the other side of the bathroom so we decided to use the entire closet space to expand the bathroom. Since we’ll no longer have a closet, we plan to do a built in closet wardrobe system in our master bedroom, but that’s a whole other project.
Not everyone’s bathroom remodel is going to look the same, some require a lot more work than others, and you may need more or less professional help depending on your skill level. My dad and I did the entire bathroom remodel by ourselves except for the rough in plumbing. I’m going to go through how to remodel a bathroom from start to finish. I’ll also go over our budget and the final cost, how long the remodel took, as well as the things we would have done differently. There’s SO much planning involved with remodeling a space and it may seem like a scary and daunting process so I’m breaking down our bathroom remodel step by step, in hopes that it will help you when it comes time to remodel your bathroom.


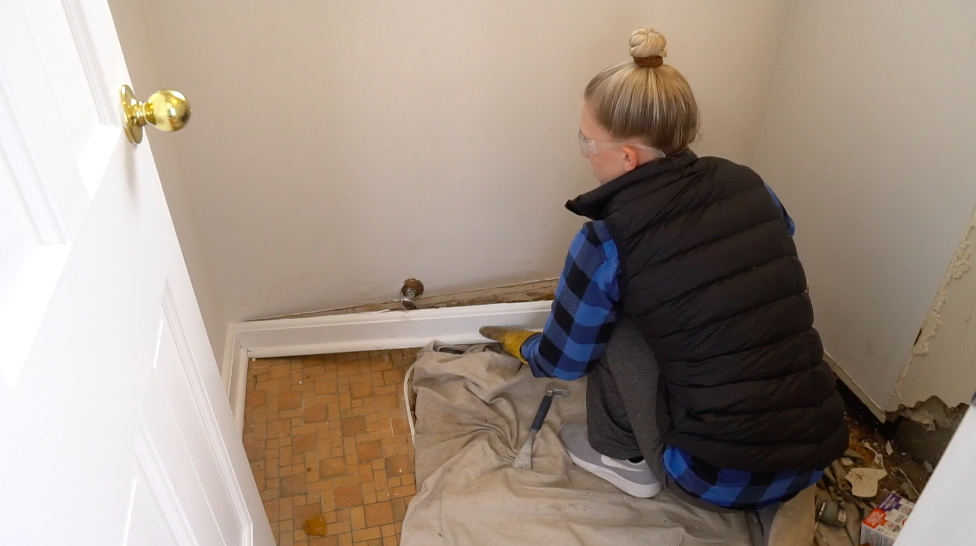
Here is what our bathroom / closet situation looked like before. It wasn’t in the budget to add on or do any major structural changes so we only had this small space to work with. Although the master bathroom is going to still be pretty small, we’re adding a ton of value to the house by adding a second shower. With taking the closet wall down the bathroom is now about 44 square feet.
!!Check out my YouTube video on how to remodel a bathroom!!

How to Remodel a Bathroom
Step 1: Planning (Design)
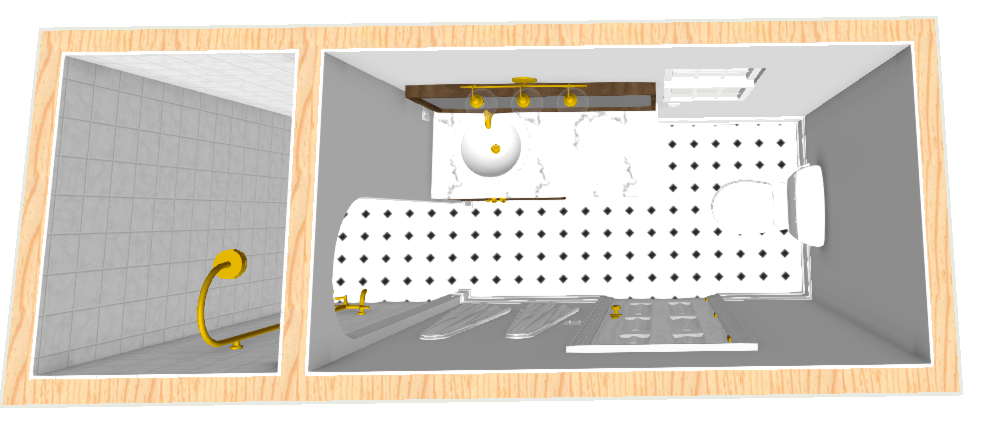
Take measurements of your space and start sketching it out on paper or in a design program. I use Home Designer Suite to design my spaces, and I love it because you can put in your exact dimensions, they have a catalogue full of furniture, decor, fixtures to chose from, and you can customize colors and textures to really make the design an accurate representation of what your space will look like.
A lot of these design softwares will offer a free trial, so that might be the way to go if you don’t plan on using the software more than once. A pencil and paper work fine too, but like I said the home design softwares will give you a better idea of scale and what the finished space will look like.
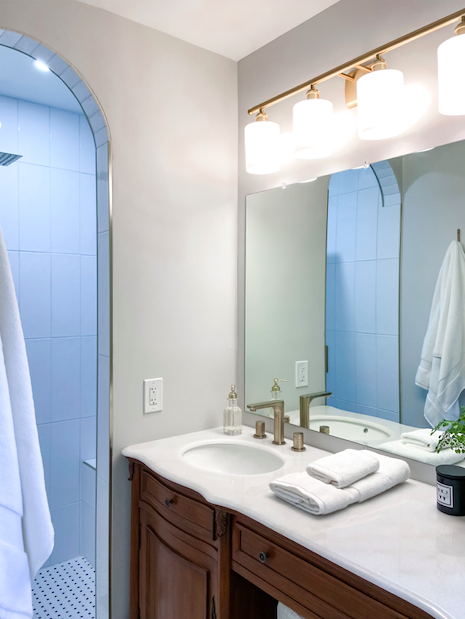
Here’s our bathroom in the home designer suite program, as you can see, our design plan was pretty close to the final real life plan, we are so happy with how everything turned out.


Come up with your ideal design plan and incorporate everything on your wish list. You can always take things off, but at least you can get a price for everything to see what fits and what doesn’t fit in your budget.
As you can see we changed the entire layout of the bathroom and added a shower. We could’ve left the toilet and the vanity plumbing in the same location to save money. But we found room in our budget to reconfigure the plumbing and the flow is just so much better this way.
Step 2: Planning (Budget / Timeline / Hire Out)
Budget
First, determine your budget. What are you comfortable spending? Is there a number that you absolutely can’t go over? Determine that number and then add AT LEAST a 10% buffer for unexpected issues. Problems are more than likely going arise during construction so it’s good to have a little cushion. Once you have that number in mind make a spreadsheet and start making an itemized list for everything that you’ll need for the remodel. If you don’t want to take the time to do that, at least come up with an allowance for each category, that’s what I did and you can see below how I broke up my bathroom items into categories.
In order to get an accurate idea of the cost, start your shopping early and find prices for the exact items or similar items that you want to use. It’s easy to get the price of items that you can control like the toilet, vanity, plumbing fixtures, light fixtures, things like that. For tile and flooring you can use online calculators to determine how much material you will need. It’s a little more difficult to break down the price for other miscellaneous tools and materials that you may not know that you need yet but if you break the project down into steps and then try to go through possible materials and tools that you’ll need for each step you can get a pretty good idea of cost. I like to go on homedepot.com or lowes.com and use their prices as guide.
**Later in the post I go over what we set for our budget as well as the actual final cost.
| CATEGORY | ALLOWANCE |
| Demo | $200 |
| Plumbing Rough-In | $2800 |
| Close up Floor | $80 |
| Electrical Rough-In | $150 |
| Frame & Close up Walls | $150 |
| Tape & Mud | $80 |
| Prime & Paint | $150 |
| Tile / Flooring | $800 |
| Trim | $150 |
| Install Vanity & Sink | $1050 |
| Install Electrical Fixtures | $800 |
| Install Plumbing Fixtures | $800 |
| Accessories | $190 |
| 10% Buffer | $600 |
| TOTAL | $8,000 |
Hire Out
Determine which tasks you want to do yourself and which ones to hire out. You could hire a general contractor or project manager to run the job for you but you will obviously be paying more money to go that route. If you’re unsure of how to do a certain task look up some YouTube tutorials and if it seems like something you can tackle yourself, go for it, but be aware of building codes. Sometimes hiring a licensed professional is the best way to go because it will save you time and all the headache of trying to do it yourself. Like I mentioned, we hired a professional plumber to come in and do all the rough in plumbing and then we felt comfortable doing the rest of the work ourselves.
Ask friends, family and neighbors for recommendations on contractors and call around to see who can give you the best price, and who can work with your timeline.
Timeline
Establish a timeline. I like to chose an end date of when I want the project to be done and then start planning backwards. I think that having a set end date gives you that extra boost of motivation to get things done in time. Make sure your contractors are aware of your timeline as well. I tend to underestimate how long things will take with every project. So try your best to set a realistic timeline.
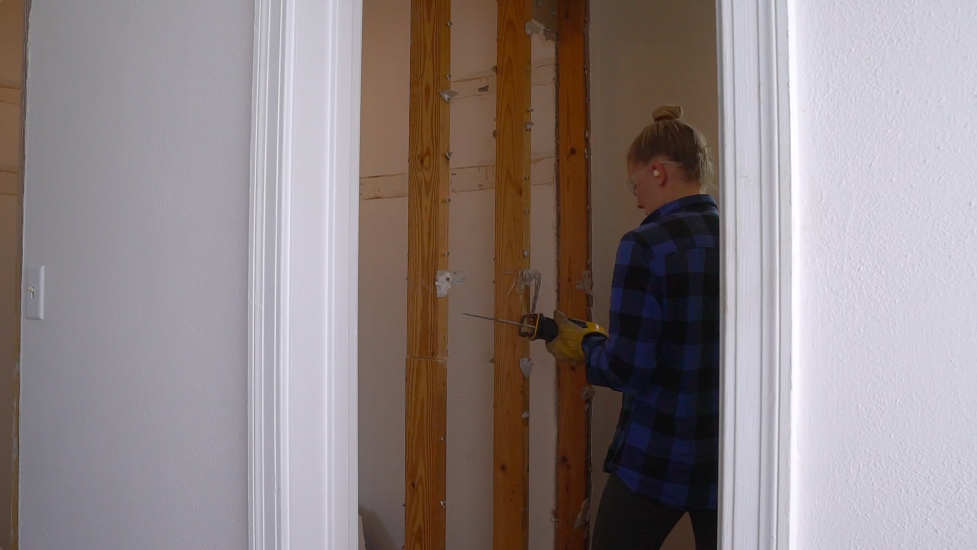
Step 3: DEMO!!
I know demo looks super fun on those HGTV shows, but it’s a lot of work and you really have to be careful with your existing plumbing and electrical. Make sure you have the right tools for demo and wear proper protective equipment.
I started by taking everything out of the closet and the bathroom, we removed the toilet, the sink and the vanity. Make sure to turn off the water supply when you’re removing these fixtures. Be sure to turn the power off to the room if you’re working close to electrical as well.


Use an old towel or rag to plug the toilet’s waste pipe to prevent gasses from coming out and to prevent things falling into the hole.
If you’re taking out any walls, make sure they’re not load bearing. If you’re not sure, ask a professional for help.
We rented a truck from Home Depot and loaded all of our trash from the demo in the truck and took it to a local waste facility. It may be a good idea to rent a dumpster or one of those dumpster bags. I can’t believe how much waste we had from our tiny bathroom. The truck rental cost $80 and disposing the waste was $53.
Step 4: Plumbing Rough-In
I’m not going to go into too much detail on this because I don’t have a lot of plumbing knowledge. We hired a professional plumber to break up the concrete. They added a drain pipe for the new shower, they moved the plumbing for the toilet and for the vanity and then capped off some of the existing plumbing lines. For the rough in plumbing labor, materials and permitting that cost was $3,400. A hefty portion of our budget, but it was so worth it.
If you have the knowledge and the tools to do this yourself you could save a lot of money. It can also be a huge headache and potentially a costly mistake if you end up running into issues.
Step 5: Close up Floor
We broke up any of the existing til that was left and then it was time to fill in the floor with concrete. We mixed out own concrete and just used 5 gallon buckets to haul the concrete into the house. Before pouring the concrete my dad set the shower drain. We made sure that the concrete had a good slope towards the shower drain.
Step 6: Electrical Rough-In
Next is the electrical rough in. Relocate or install additional outlets and switches while your walls are open. Use GFCI receptacles for the outlets located near water. Relocate or install receptacles for your light fixtures and exhaust fan. If you don’t feel comfortable with electrical I recommend hiring a professional, or at least getting your electrical inspected to make sure everything is wired properly before closing up your walls.
Step 7: Frame / Close up Walls
We started by framing in that existing doorway from the closet. Before framing the shower partition wall we wanted to drywall the ceiling. The entire bathroom was not level so we had to cut these furring strips and screw them into the ceiling so that our drywall was nice and level.
After the ceiling was drywalled, we framed in that shower partition wall. We framed a custom arch out of plywood, this might be my favorite part of the entire bathroom remodel. We also framed in a little bench for the shower.
After after everything was framed in we drywalled the entire bathroom and used cement board in the shower because it’s resistant to moisture and it’s a good backer for wall tile. We ended up drywalling right over the old plaster. That plaster is so messy to work with and it would’ve been a big mess to take all of it out.
Step 8: Tape & Mud
Next step is to tape and mud the bathroom, we also had to tape and mud the outside wall of the bathroom because we closed up that doorway.
Step 9: Prime & Paint
Now it’s time to prime and paint! I started by using 1 coat of primer. I used a flat white paint for the ceiling, a satin white paint for the trim and and eggshell gray color for the walls. It’s good to paint now so that you don’t have to worry about getting paint on your flooring or any furniture & fixtures.
Step 10: Tile / Flooring
If you’re installing a tub/shower enclosure, now’s the time to do that. We wanted to give our shower a nice custom look with tile. Before tiling the shower I used this pink waterproofing membrane, and before tling the floors we used this bonding agent and skimcoat mix to make sure the floors were nice and level for our tile.
I got our floor and wall tile from floor and decor and absolutely love how it turned out. We used white grout and made sure to use silicone caulk for the corners in the shower.
Step 11: Trim
Next step is trim! I bought the same type of trim to match the existing trim in our house and painted it a clean white color. You may want to install your trim after installing your vanity depending on the style.
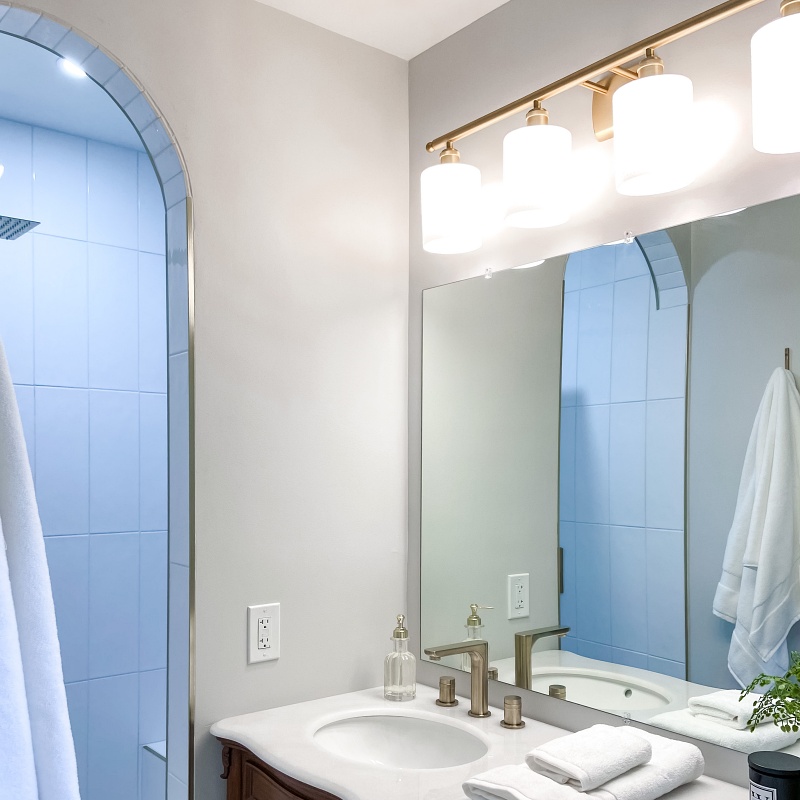
Step 12: Install Vanity & Sink
I bought this vanity from Wayfair, the countertop / sink everything came together. Instead of a double sink vanity we opted with 1 sink so we could have extra countertop space. and I love that I have a little makeup counter with a stool.
Step 13: Install Electrical Fixtures
Now it’s time to install any outlet or switch plates, light fixtures, light bulbs, exhaust van or vent covers.
Step 14: Install Plumbing Fixtures
Install your shower fixtures, faucets, toilet. After installing your plumbing fixtures it’s smart to use silicone caulk in any wet areas.
Step 15: Accessories
Last but not least it’s time to add your toilet paper holder, towel hooks, mirrors, rugs, etc. Be sure to figure these items into your budget because they add up pretty quick!
Budget / Cost Breakdown
When my husband and I first had the conversation about our budget for the bathroom we wanted to stay within $6k-$8k. Instead of breaking down the cost of each item (which would have given us a more accurate idea of the cost) we just came up with an allowance for each category. We weren’t super strict with our budget so we were okay with going over if we had to. But if you have a strict budget you need to stick to I recommend making a spreadsheet and breaking down the cost of every single item. And be sure to add at least a 10% buffer for unexpected issues. Problems are more than likely going arise during construction so it’s good to have a little cushion.
As the project was underway that $8k mark came up pretty quick. We ended up going over budget but not by much, the final cost of the bathroom remodel was: $8,300. One of the major things that set us over budget was the Plumbers. My Dad and I were going to try and tackle all of the plumbing by ourselves (my dad has experience with plumbing), but it would’ve taken us much longer and it would’ve been such a headache trying to buy or rent all of the proper tools that we didn’t have. Hiring a professional plumber saved us a lot of time and that was important because we had a deadline to meet and it’s comforting to know that everything was done properly rather than us cutting some corners and ending up with issues down the road. With hiring a professional plumber they had to pull permits and have an inspector come out at different phases of the project so we know that things were done right and to code and that’s a good feeling.
Here’s a break down of what our 44 Sq ft bathroom remodel cost in more detail:
| ITEM | COST |
| Demo (tools / truck rental / waste removal) | $200 |
| Concrete Mix / Tools | $30 |
| Toilet | $125 |
| Vanity / Countertop / Sink | $1,030 |
| Sink Faucet / Drain | $86 |
| Shower / Floor Tile (tools & materials) | $1,500 |
| Shower Head / Drain | $258 |
| Mirror | $53 |
| Light Fixtures / Light bulbs | $400 |
| Paint | $230 |
| Trim | $150 |
| Accessories (rug, tp holder, towel hooks, shower curtain/rings, shower rod, vanity stool) | $180 |
| Professional Plumbing (Rough in labor / materials, permitting) | $3,400 |
| Framing / Drywall / Cement Board | $300 |
| Misc: Electrical / plumbing / framing / materials / tools | $358 |
| TOTAL | $8,300 |
How Long did the Remodel Take?
The remodel took us about 20 full 8-hour days.
What Would we Do Different?
Set up another living space instead of trying to live around construction. I tried to live in our bedroom during the construction. I would cover everything with plastic during the day and then try and clean everything up before bed, or just crash on the couch. The back and forth was exhausting and it was annoying when I needed to get at my stuff that was covered in plastic. I’m big on routine so I wish I would’ve set up a better temporary living space. I recommend moving into a guest bedroom or setting up an air mattress, and set up your toiletries in another bathroom to lessen the stress of living in construction.
Plumbing Fixtures. I wish I would’ve done more research on my plumbing fixtures and ordered them more in advance. The plumbers were scheduled and I had to rush order my drain and shower fixture so that the plumbers had the information that they needed when doing the rough in plumbing.
Also, make sure your water heater has the capacity to supply your new bathroom. I opted to go with this fancy rainfall shower head and the first time I took a shower I ran out of hot water because the water output was too much for our hot water tank. It wasn’t the end of the world though because I bought a diverter to attach to the shower head so I could control the water supply. Just something to think about if you’re worried about water supply.
TURN OFF THE MAIN WATER SUPPLY DURING DEMO! Especially in an older home with brittle pipes. We did not turn off the main water supply during demo, and when we were removing our old vanity, we accidentally broke a water line before the shut off valve that was under the sink and we had water shooting up at the ceiling like a fire hose!!! Plus, I just moved into this house so we didn’t know where the main water shut off was, so we were running around like crazy trying to find the main shut off valve while the entire bathroom and half of our bedroom was flooding with water. It was a traumatic experience but we learned a good lesson that day and we’ll never make that mistake again. Lucky enough there was no damage or extra expenses involved.
That is all I have for you guys on remodeling a bathroom. I hope you find this information helpful when it comes time to remodel your bathroom. I will be posting another video soon on the built in closet wardrobe system so keep an eye out for that. You can find me on Instagram at Home With Stefani, I post more house updates on my instagram so go check it out! Thank you so much for watching and if you’re about to start your own bathroom remodel, good luck!!