Upper Cabinets vs. Open Shelving
When we gutted our kitchen, every upper cabinet came down during demo. When it came time to design the new space, we had a real decision in front of us: put upper cabinets back in, or go with open shelving instead. We chose open shelving across the full run of the kitchen, and it’s one of those decisions people either love or think is a mistake.

After living with it for several months, here’s an honest look at the pros, the cons, the different types of open shelving worth knowing about, and whether I’d make the same call again.
Why We Considered Open Shelving Over Upper Cabinets
We have a 1982 colonial-style home with dark wood trim and warm tones throughout, and open shelving fit that space in a way that felt intentional rather than forced. It was also the more budget-friendly route. Skipping the cost of upper cabinet boxes and doors, and building our own shelves instead, made a real difference in our overall renovation cost.
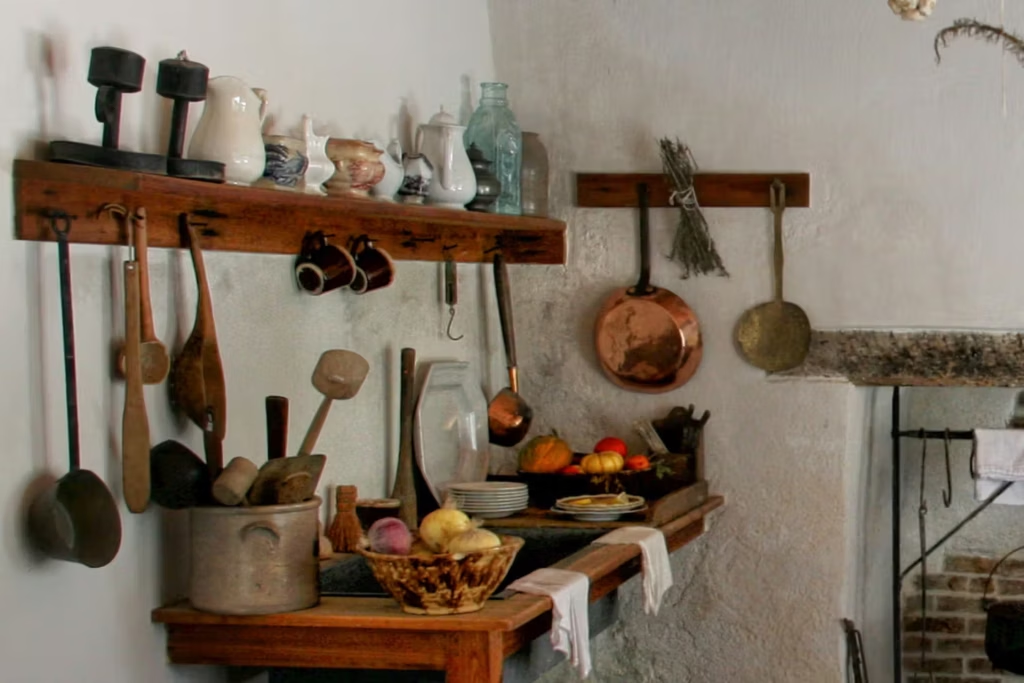
Open shelving isn’t a new trend, either. It’s how kitchens actually functioned in early American colonial homes. Before fitted cabinetry became standard, colonial kitchens used wall-mounted shelves and standalone furniture for everyday kitchenware, since built-in cabinets with doors weren’t widely available yet. Plates, bowls, and cooking tools sat on open shelves near the hearth so they stayed within reach, and open storage let wood and iron cookware air dry after washing. In a house with colonial character, bringing that back felt less like following a trend and more like returning to what made sense in a home like ours to begin with.

Types of Open Shelving to Consider
If you’re weighing open shelving for your own kitchen, it helps to know the main approaches before you commit. Sturdiness matters most here, since the method you choose needs to match what you’re actually planning to store.
Cleat and corbel. This is what we did: a wall cleat screwed into studs, wood corbels for support, and a solid wood shelf resting on top. It’s one of the sturdier DIY-friendly options, and corbels give you a lot of flexibility in style, whether you want something traditional, farmhouse, or modern.

Bracket-mounted floating shelves. These use heavy-duty metal brackets, either exposed as part of the look or hidden inside the shelf for a cleaner line. Hidden brackets read more minimal and contemporary. Whichever bracket style you choose, anchor into studs or use wall anchors rated for the load you’re putting on them.

Pipe and flange shelving. This uses black iron pipes as the support system and is common in modern farmhouse and industrial-leaning kitchens. When installed correctly, it’s extremely sturdy, and the pipes become part of the aesthetic rather than something you’re hiding.

Live edge or solid wood slab shelving. Usually paired with metal brackets, these are heavier and typically a bigger investment, but they bring a lot of warmth and character, especially in a kitchen that already has natural wood elements.

Across all of these, the one rule that doesn’t change is anchoring into studs. Kitchen shelves carry real weight, and that isn’t a place to cut corners.
How We Built Ours
For anyone considering the cleat and corbel method specifically, our build was straightforward. We used pine boards throughout, a 1×4 for the wall cleat and a 1×12 for the actual shelf. Pine is affordable and easy to work with, and it looks great once it’s primed and painted. We painted everything before installation, which I’d recommend every time, since it’s much easier than cutting in paint around a shelf that’s already mounted.

The 1×4 cleat gets nailed to the wall and screwed into studs wherever possible. The corbels mount to the cleat, and the shelf sits on top. Painting and prep took about a day, and the install itself took another day, so two days total from start to finish.
What Works Well
It’s budget-friendly. Skipping upper cabinet boxes and doors made a real difference in overall cost, and pine boards and corbels are inexpensive materials to begin with.
It makes the kitchen feel larger. Upper cabinets create a visual wall that closes a space in. Without them, your eye travels up to the ceiling and the room reads more open, which matters especially in a kitchen with a lot of warm, dark tones like ours.
Everyday access is easier. Everything we reach for regularly is right there, with no cabinet door to open or shelf to dig through.
It pushes you to edit. This is the one I didn’t fully anticipate. Because everything on open shelves is visible, we naturally pared down our dish collection to what we actually use. Our everyday dishes are simple white plates, bowls, and clean drinkware that display well. Coffee cups hang on pegs near the coffee maker. A few pieces we reach for regularly, like colanders and vases, sit on a smaller section at the end. That edit made washing up and putting things away faster and simpler than it was with upper cabinets.

What You Need to Know Going In
There are real trade-offs here, and it’s worth being honest about them before you commit.
It can look cluttered fast. If you don’t have a system, or if things tend to pile up on your counters already, open shelving will show every bit of it. There’s no door to close over the mess.
It takes some trial and error to get right. Early on, we had too much on the shelves. Once we edited down to daily-use items and kept a consistent look, mostly white dishes with simple lines and nothing random mixed in, it came together. That took a few rounds of editing, not just one pass.
Dust and grease are a real maintenance step. Exposed shelves need more regular wiping down than cabinets with doors. A semi-gloss paint finish makes it a quick wipe, but it’s an ongoing task that doesn’t go away the way it would with a cabinet door in front of it.
If you tend to accumulate things, or you have a lot of mismatched dishware, open shelving is going to ask more of your daily habits than a set of upper cabinets would. It works best when you’re willing to keep only what you need up there and give it a consistent look.

The Verdict: Would I Do It Again?
After several months of using this kitchen every day, I have zero regrets about this decision. The shelves fit the house, they fit how we actually use the kitchen, and they cost less to install than upper cabinets would have. They’ve also pushed us toward a simpler, more functional setup that genuinely works better day to day.
When open shelving goes wrong, it’s usually an execution problem rather than a concept problem. Flimsy shelves, overcrowded styling, or mismatched items on display will make any shelving look bad. Built correctly, anchored properly, and kept intentional, it holds up in every sense, and it’s a call I’d make again.


